

4 Things You Need to Know About Fitting a Toilet Seat.
If you have a toilet seat that’s loose or broken and you want a nice solid seat to sit on comfortably while you pass the hours on TikTok or Facebook then this is for you.
Changing a toilet seat is one of the easier jobs you can do in your home and if you are lucky you won’t even need any tools, well maybe a tape measure and a screwdriver, but there are a few of things that are good to know.
Let’s get into it –
If you are thinking that toilet seats are all the same and you can just go and pick one up you would be wrong There as so many to choose from so where do you start?
1. Toilet Shapes
The first thing to consider is the shape of your toilet. There are several different shapes of toilet bowl. You have to choose one that is the shape of your toilet. There are Oval, D-shape (or U-shape), V-shape, or Square among others but these are the main ones for the UK, not really sure about the rest of the world.
Look at the shape of your toilet bowl and work out which one is your shape. Once you have decided on the closest shape to your toilet it’s time to move to the next point.
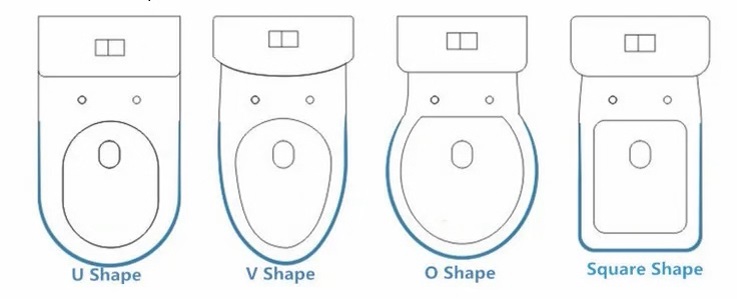
My toilet is the most common shape – the O shape.
2. Measure the Size
Once you know what shape of seat we have we then need to measure the size of the bowl from side to side and from the fittings to front.
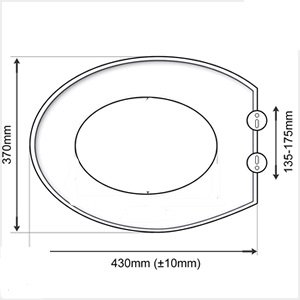
Once you have measured the size of your bowl you may not have the exact same measurements as the replacement seat. What I tend to do is get one that is about up to 20mm larger and usually you can adjust it to sit perfectly on your toilet without a ridiculous overhang.
Then you need to order the seat that will fit your size of the bowl.
But Wait! There is something else we need to consider.
3. Decide on the Material
Before we order there are a few things to consider, mainly, the types of materials that toilet seats are made from. There is MDF, wood, plastic, Duroplast, and a few others.
Mdf is really quite common- that’s what my old seat is made from. Now if water gets into MDF it starts to swell. Once swollen it’s not going back to the way it was. The toilet seat is basically finished.
This toilet seat started swelling about 2 weeks ago and once the swelling started it very quickly lost strength and fell off one side.
Usually, your toilet seat won’t get wet and I have no idea why this happened to this seat so quickly, obviously, it did get wet at some point and pretty much exploded.
So I thought about a wooden one but wood really doesn’t like the moist environments of a bathroom.
Plastic is a good option but some plastic seats are really flimsy and the cheaper ones tend to discolour over time.
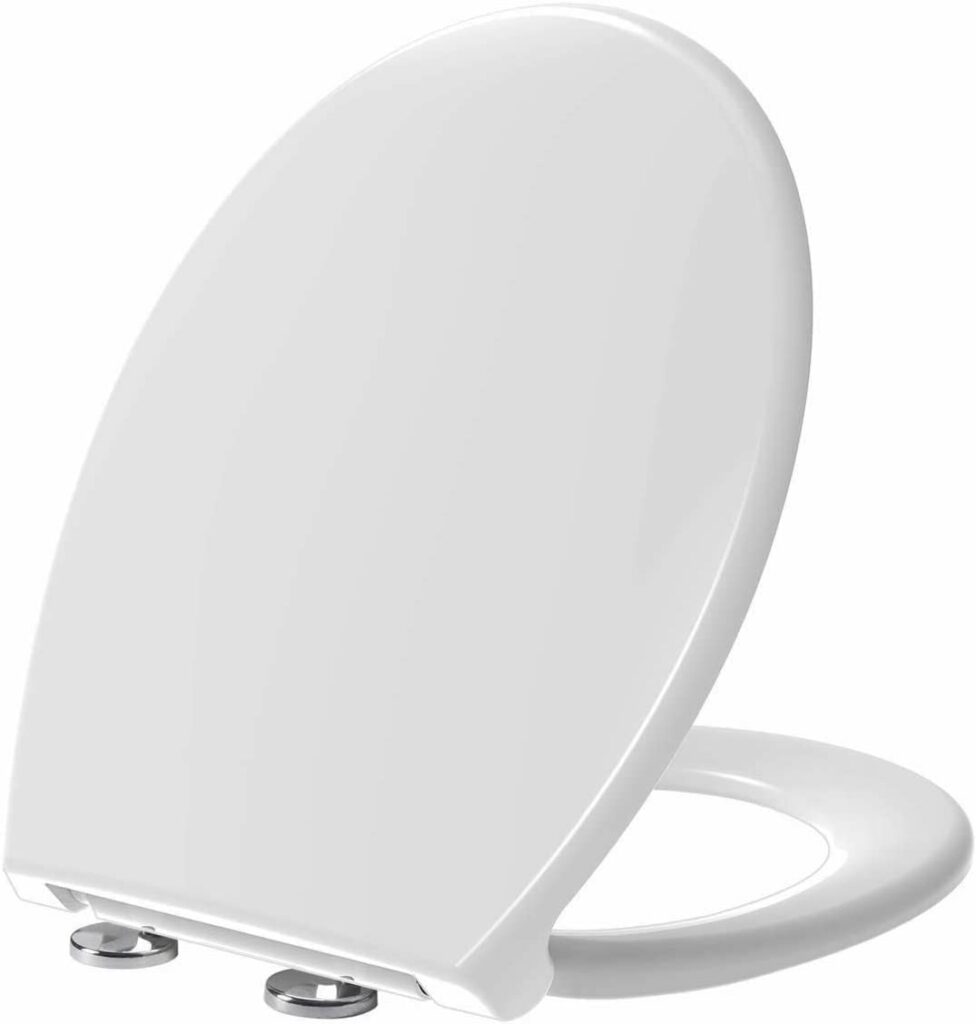
Then I found something called Duroplast. These seats seem to be tough and durable, colour fast, easy to clean, and strong- most importantly they don’t mind getting wet. The one I chose is UF Duroplast which should look good and last a very long time.
Now we need to order – well, not yet – one more thing to consider
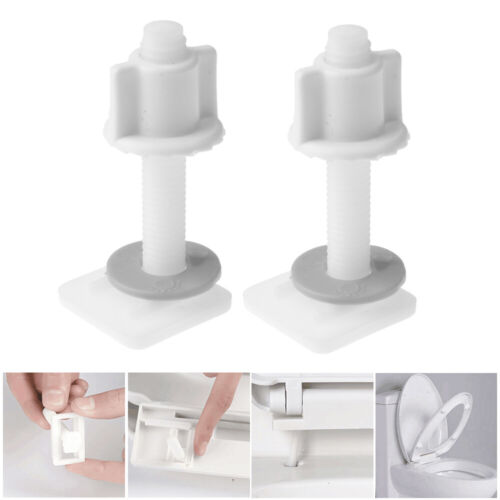
4. Different Seat Fittings
If you have access to the rear of the toilet and can reach the seat fittings you are in luck.
So there are a couple of ways to fit the seat to the bowl – generally you either have access to the rear of your toilet or you don’t
If you have access to the seat fittings you can fit the bolt-type fittings. These are probably the most common type of fitting. They are quite easy to put on and can be tightened up so they don’t move again. Fitted properly they will last a very long time without moving.
The main downside is that they can rust and seize and they become very difficult to get off.
If you can’t get to the rear of your toilet you have no choice but to use the top fixings. These are great for fitting and are generally easy to put on. The downside of these is that they can loosen off over time.
But usually, they are very easy to tighten again so it’s not a big problem and you won’t have to pull the toilet off the wall for access to the screws.

5. Time to Order
Finally, time to order but before you do just double-check you have the info required.
So the four things to know
1. Toilet Shape
2. Measure the size
3 Material preference
4 Type of fittings required
Once you have done this and order a seat with this in mind fitting the seat should be an absolute breeze
All there is to do now is wait for your new seat to arrive.
Here is the toilet seat I ordered for my toilet, we have been using it for quite a while now and had no problems with it. It seems to be very durable and is very easy to clean. Click the image to find out more.

6. Fit Your Toilet Seat
The very first thing to do is check out your new seat and make sure all the parts are there and the fittings are there. If you do this first then you won’t have to do without a toilet seat if there are any parts missing.
So when you are fitting you have to take the old seat off. Go to the back of the toilet and undo the fittings. Now sometimes they may have rusted up and you may need a pair of pliers or grips to get it to turn
- Undo the fittings
2. Remove the old seat
3. Clean up the toilet before fitting the new seat.
I have to use the top style fitting as access is really restricted making the bottom fittings almost impossible to fit.
4. Fit the fittings so they can move a little
5. Put the seat gently on the fittings and straighten the seat up with the bowl
6. Tighten the fittings
Fittings are generally hand-tight and but you can just give them a little more with some pliers – I’m talking about a quarter turn above hand tightness. Any more and you can cut through or warp the rubber or plastic washers, which can cause your seat to go loose sooner than it normally would.
Test the seat.
Start Scrolling
Here is a video I put together showing the whole process.